Showing posts with label craft. Show all posts

Monday 10 April 2017

Dye wool with fungus

We have had a lot of rain recently (and our tanks are full) so of course all the fungal spores in the soil have taken advantage of this and popped up mushrooms and shelf fungus everywhere. There is a lot of information online about dying wool (and other protein fibres) with fungus, so I decided to have a wander around and see what I could find to experiment with.

In the bush around our humpy I found many kinds of fungus after just a cursory look; I haven't tried to identify them as I am mostly interested in using them for dye. It's not a great idea to eat mushrooms you aren't able to identify, and I won't do it. I will also be using gloves to process my collected bounty, just in case they prove to be toxic.

Below is a collection of photos of the fungal and lichen life I found in my little adventure.


The plan is to dry most of the current harvest for later experimenting. I couldn't resist trying one little experiment though.
I used a lovely brown shelf fungus I found on a dead tree with two tablespoons of washing soda to make an orange/ yellow dye pot. I simmered the pot of water, fungus and washing soda for an hour. Then I plonked in some merino home spun yarn and let it all cool overnight.
After rinsing and drying I ended up with a golden yellowish coloured yarn that my daughter has named 'You dirty sheep', the name doesn't do justice to the colour which is actually quite beautiful. I can't wait to do some more experiments to see what I will get.

The little shelf fungus on the left gave the muted golden yellow of this yarn.


Wednesday 26 October 2016

Learning to make wine


Over the last three months or so I have been learning to make wine. Several people have expressed the opinion that my timing is not great; given that I am learning to drive at the same time. You don't have to worry yet though...wine making is a long, slow process.

Having always been interested in the process of fermented foods (or transformation in any guise really) I began by learning to make sourdough bread. This led to thinking about how wine is really just rotten fruit water (that tastes good) and how amazing that is. After a lot of reading on the internet and a visit to the local library I was ready to get fermenting.

Wine makers seem to range from those who elevate the process to an art or a science to those who accidentally left some juice out and found it had miraculously become wine by the time they got around to cleaning the kitchen. I figured that since we have been making the stuff for the last 6000 years or so, you probably don't need to build a lab to do it.

My first batch was apple cider, made from store bought apple juice (so I could get an understanding of the process). A demijohn (big glass bottle), some yeast, Campden tablets and a bung/airlock were duly ordered from an online shop and when they arrived I began the learning journey.

I didn't photograph that first batch (or the honey mead and the blueberry wine that came after) so I thought I would show you the process with a new batch (and because putting a new batch together is just so exciting I will take any excuse to make more wine). This batch is made from store bought juice again, I used grape juice with a little bit of apple thrown in for flavour.


The only immutable law in wine making is that everything (and I mean everything) has to be clean and sterile. I made up a sink full of sterilizing fluid by crushing two Campden tablets and dissolving them in water. I was a little worried about using sodium metabisulfite (which is a sulfur based material) in our system as anything designed to kill yeasts and bacteria will affect the health of soil and water. However the risks are very low when using it as infrequently as I do.

I didn't take a photo of the sink (you all know what that looks like). This is my beaten up pack of Campden tablets.


After everything is sterilized (equipment, counter tops, hands, stray pets) it is time to activate the yeast. This is just a matter of mixing the yeast with warm water and fruit juice in a cup and putting it somewhere it won't get spilled. Wine yeast is sold in neat little sachets containing dehydrated powder. When the yeast is mixed with liquid it starts to wake up and look for food, just what you want in a yeast.

My neat little yeast sachet and a bowl of apple juice and water.

This is the yeast when it is first mixed into the juice.

This is the yeast after about half an hour. Some is missing because I forgot to take a photo before beginning to pour it into the juice.


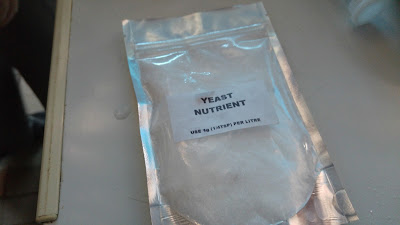
Next the juice (or fruit mush) is mixed with sugar in a pot on the stove, I used five cups of sugar in this batch. I heated the juice gently and stirred (not so gently) to dissolve all the sugar. When all the sugar was dissolved I poured the lot into a sterilized demijohn, added a teaspoon of yeast nutrient (don't ask me what that is, the books said I needed it) and popped on an airlock and bung.

Speaks for itself really.

 Most web sites recommend taking a specific gravity reading with a hydrometer before you pour in the yeast. I bought a hydrometer to do just that, then forgot to use it. Next time I will definitely do this though as it apparently gives you a better idea of how alcoholic the final product is. I guess for now I will have to rely on the tipsy test (you know...how many glasses does it take to make you tipsy).


The airlock and bung are the funny bits at the top of the big bottle. Airlocks let gas escape but don't let gas in.


 The general idea is to wait until the bubbling stops (between days and weeks) then rack the wine into a clean, sterile demijohn with a new sterilized airlock leaving behind the dead yeast (called lees) which forms a sludge in the bottom. I use a food grade hose (sterilized of course) to siphon out the good wine but leave the lees behind. The wine is left in this demijohn for another month or two until it is clear (apparently you should be able to read through the bottle) then bottled and stored for a further few months or years. After all that you can open a bottle and have a taste.

This is the batch, bubbling away producing alcohol.

My first batch of apple cider. I started it three months ago and opened my first bottle with a friend a week or so ago.

As you can see, the process of making wine is long and slow. The fact that it has taken so long to make and involved so much sterilizing, washing and general fiddling makes every bottle special. If someone gives you a bottle of home made wine they must really like you.

Friday 8 July 2016

Upcycling old tiles into wall art


Coffee, craft and off colour jokes.
A while ago my dad bought down a pile of old mismatched tiles he had found while cleaning out his shed. These little beauties sat on the useful pile for a few months waiting to become something. Yesterday inspiration hit... the girls are home for a visit and we were having a craft day...fueled by ill-advised internet searches (damned Pinterest). We made Popsicle stick bracelets,tile wall art and did some applique.

The wall tiles were so easy and so much fun. I don't usually make decorative things; I prefer making useful items, but my daughters convinced me. I must say the process was easy and very satisfying.

Three of my finished tiles

First we found a tutorial that we understood; The Crunchy Betty blog is written in easy to understand language (just follow the link). Then we dug around and found all the essential ingredients we needed;

tiles
photos and/or diagrams
Mod Podge
foam applicators
Spray on varnish
felt sheets
hot glue gun and glue
Super glue
picture hanging hooks

 I didn't take any photos of the ingredients gathering, but the list isn't long.


 Then we spread out some newspaper and painted Mod Podge onto our tiles. This step required making a new pot of coffee and telling off colour jokes (just to keep things interesting). We glued our pictures onto the tiles; one of my daughters had to re-glue hers as it wasn't exactly straight and she couldn't live with it. The next step was to wait for the first layer of Mod Podge to dry clear...so we started decorating some Paddlepop stick bracelets we had made previously (ADHD is rampant in my family).

Spreading out our first layer

Decorating our bracelets

This fox design is burned into the wood with an old soldering iron.

As an aside....we soaked our Paddlepop sticks in vinegar for about 15 minutes then bent them into coffee cups (as in this photo) and left them to dry by the fire. When they were dry we took them out and decorated them.


Our tiles with the pictures glued down and the second coat of Mod Podge on

 We coated our tiles with Mod Podge a total of three times, waited for them to dry between each coat, then sprayed some varnish over the top. We put the tiles in the sun to dry for an hour or so and did a spot of sewing.

An applique blanket as an ode to my eldest daughter's favourite TV show.

As a finishing touch we super glued some picture hooks to our tiles and covered the backs with felt squares (hot glued on).

Super glue will hold the little hook things on the tiles...we hope

Felt squares glued to the back finished off our tiles.

Our craft day was a lot of fun and we learned a couple of new things;

Don't allow free roaming birds on the craft table when using Mod Podge (Barry was very interested) and;
Get your pictures straight the first time (or you have to reprint them).

Now I have to make a wall to hang my new tiles on.

Saturday 23 April 2016

Hawser ply yarn- An accidental discovery

Sometimes happy accidents happen, and this is one of them.
I am currently completing the last two units of a Bachelor of Education (primary), these last two units are hard and require a lot of brain space. I usually spin, weave or knit in the evenings (after a long day at the computer) to relax and do something productive. So last week I decided to try a new plying method for making fingering weight yarn (plying is when you twist two strands together to make a stronger and thicker yarn). The usual method is to spin singles in a clockwise direction and then ply two together in an anticlockwise direction. My new method involved winding the singles into a centre pull ball and plying in the usual anticlockwise direction from both ends of it to make a two ply yarn.
This time I was distracted by thinking about my current assignment (teaching fractions) and plied the whole 100 g of singles in a clockwise direction (without even noticing; yes I was that distracted). The result was a really twisty yarn that could not be used for anything and looked sort of wrong. So I went looking for advice on the internet (as I always do) and found that other people have made the same mistake (unsurprising really) and decided they liked it better that way. This plying method is called Hawser ply and it is used to make super stretchy yarn for knitting cuffs on sleeves, socks and hats. The catch was that I had to make another 100 g of clockwise plyed yarn then ply them both together in a clockwise direction.

The first skein of twisty yarn.
 I found some great tips and pointers in a The Spinners Book of Yarn Designs; keep the yarn tight while it is plied and give it a good hot wash when it's done.

Two balls of mistake yarn ready to ply up. You can see how twisty it is.

After I made my mistake yarn again (on purpose this time) I plied them together in the recommended anti-clockwise direction and got a very stretchy DK weight yarn. I can't wait to knit something up with it now to see if it does make better cuffs.


Hawser yarn on the swift

The finished Hawser plyed yarn

I ended up with 200 g of  Hawser ply yarn

It's exciting to make mistakes and discover new things isn't it. I think I will make more of this type of yarn in the future, just because I can. It has also got me interested in exploring different plying methods (there are so many) and getting a bit more variability into my yarns.

Oh and I did eventually get to making some fingering weight yarn.

My second attempt at fingering weight yarn; merino this time.


Friday 8 April 2016

Natural dye experiments - gardenia powder and alum


My natural dye experiments have continued into the garden; I recently tried gardenia powder to dye some 100% wool yarn, and the results were spectacular. I found a listing for gardenia powder in my favourite dye stuffs shop (for the bits I can't make myself); KraftKolour, and having a few dollars to spend (thanks to selling some home spun cotton yarn) I bought it. I was really curious to see what sort of colour I could get from a common garden plant. My mother recently found a mixed bag of pure wool in a second hand shop in white which she gave to me (thanks Mum), so I had a decent amount of yarn to play with.

The process is really very simple; weigh your fibre; mine was 123g, gather your equipment and off you go.


My equipment and supplies.

The yarn my mum found in a second hand shop.


I decided to mordant my yarn with alum at a rate of 15g per 100g of yarn (and yes I did use a calculator to do the maths).

I weighed up my alum and popped it into my yard dyeing pot with some water.

Once I had the alum mixed in fairly well with the water in my dye pot I plonked in the yarn in handy skeins (all tied up with cotton yarn so I didn't end up with a tangled mess). I bought this pot to a simmer then turned it off and let it sit while I made up the dye.

My dye was mixed at a rate of 6g per 100g of yarn (yes...calculator again) in a big stainless steel pot. The dye comes as a sort of bluish powder but the dye pot goes a dark blue colour. I heated this water up almost to a simmer (close enough to the same temperature as the yarn in the mordant).

Then I fished out my skeins (using my trusty serving fork, that is only used for fibre work) and lowered them into the dye pot.

The yarn going into the dye pot. How pretty is that.

After about ten minutes it was this colour.

I turned off the heat on the dye pot and let the yarn sit until it was completely cool. Actually it sat in the dye until I remembered what was in the big pot on the bench while I was washing up that evening.
Then I rinsed the yarn in cool water, wrung it out and whacked it against a post to separate any felted strands (force of habit) and hung the skeins up to dry.

Drying skeins
As you can see the different brands of yarn took the dye up at varying rates. I love the different shades though and they are all very pretty.


My dried and wound up gardenia dyed yarn.


I am so impressed with this colour I think I will get spinning and make some merino home spun to try it out on; maybe I can get enough of a single shade to make a jumper or something.